

Description
This application allows the user to resize multiple images at a time. The images can be in BMP, GIF, JPG (or JPEG), PNG, or TIFF (or TIF) formats, and can be saved in any of these formats as well. The images can be resized according to a percentage of their original size or to a specific height and width in pixels (while preserving aspect ratio or not preserving aspect ratio). If you set the output size to 100%, you can also use the app to convert multiple images to another image file type (for example, convert BMP files to PNG files). The filenames of the output images can also be customized using the original filename plus custom text (see example usage below for more information).
This application is ad-free and takes minimal space on your computer.
Example Usage of Application:
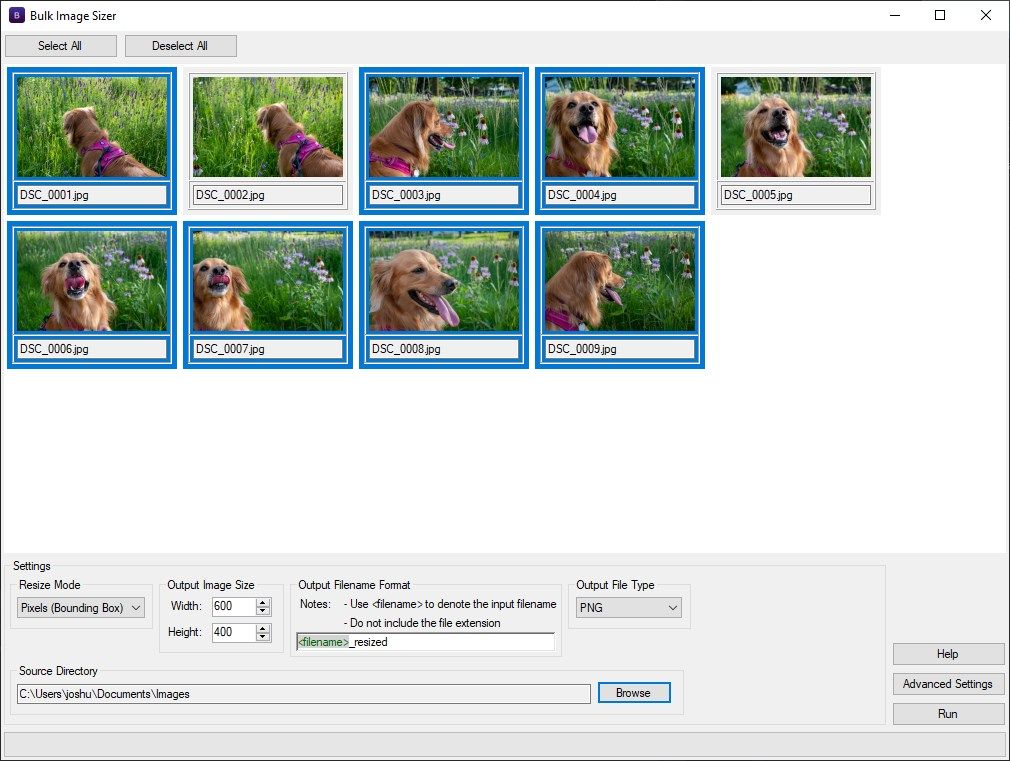
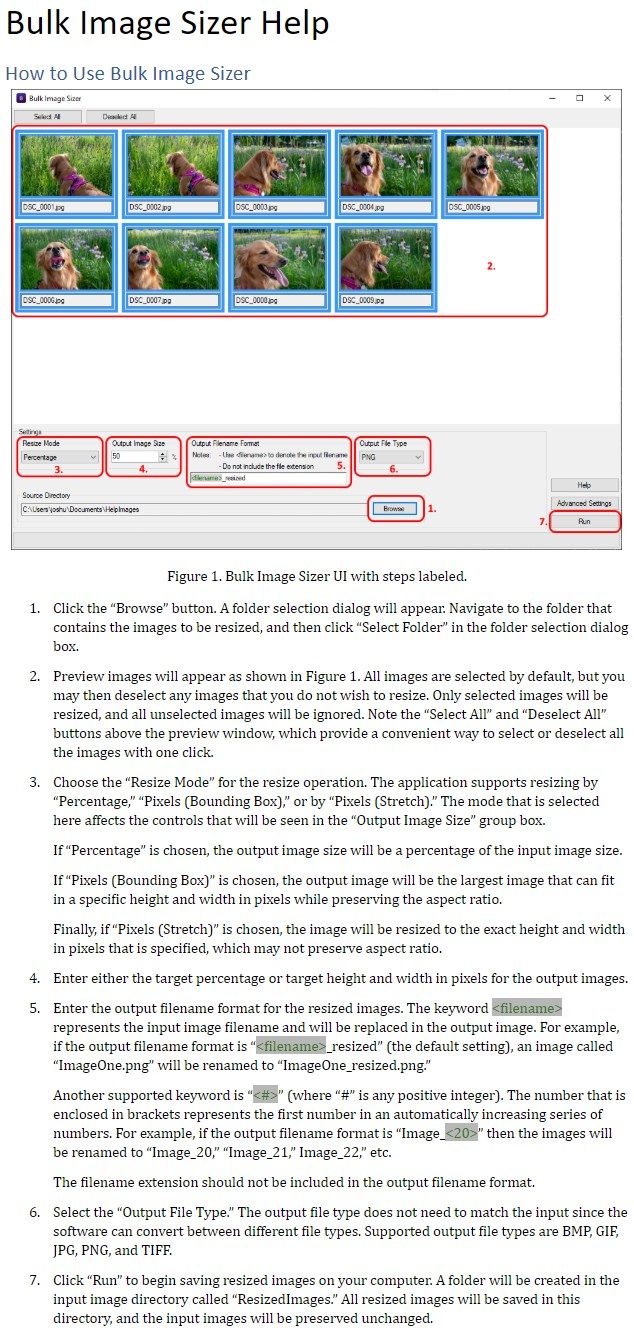
- Click the “Browse” button. A folder selection dialog will appear. Navigate to the folder that contains the images to be resized, and then click “Select Folder” in the folder selection dialog box.
- Preview images will appear as shown in Figure 1. All images are selected by default, but you may then deselect any images that you do not wish to resize. Only selected images will be resized, and all unselected images will be ignored. Note the “Select All” and “Deselect All” buttons above the preview window, which provide a convenient way to select or deselect all the images with one click.
- Choose the “Resize Mode” for the resize operation. The application supports resizing by “Percentage,” “Pixels (Bounding Box),” or by “Pixels (Stretch).” The mode that is selected here affects the controls that will be seen in the “Output Image Size” group box.
If “Percentage” is chosen, the output image size will be a percentage of the input image size.
If “Pixels (Bounding Box)” is chosen, the output image will be the largest image that can fit in a specific height and width in pixels while preserving the aspect ratio.
Finally, if “Pixels (Stretch)” is chosen, the image will be resized to the exact height and width in pixels that is specified, which may not preserve aspect ratio. - Enter either the target percentage or target height and width in pixels for the output images.
- Enter the output filename format for the resized images. The keyword
represents the input image filename and will be replaced in the output image. For example, if the output filename format is “ resized” (the default setting), an image called “ImageOne.png” will be renamed to “ImageOne_resized.png.”
Another supported keyword is “<#>” (where “#” is any positive integer). The number that is enclosed in brackets represents the first number in an automatically increasing series of numbers. For example, if the output filename format is “Image<20>” then the images will be renamed to “Image_20,” “Image_21,” Image_22,” etc.
The filename extension should not be included in the output filename format. - Select the “Output File Type.” The output file type does not need to match the input since the software can convert between different file types. Supported output file types are BMP, GIF, JPG, PNG, and TIFF.
- Click “Run” to begin saving resized images on your computer. A folder will be created in the input image directory called “ResizedImages.” All resized images will be saved in this directory, and the input images will be preserved unchanged.
-
Resize Images
-
Convert Image File Types
-
Save Images as PNG Files
-
Save Images as JPG Files
-
Save Images as BMP Files
-
Save Images as TIFF Files
-
Ad-Free
-
Small Download